Having lived in Berkeley for four years, I have become accustomed to the ease with which one can obtain high-quality artisan breads. Acme Bread and Cheeseboard’s Bakery, to name a few, create wonderful pieces of carbohydrate-goodness. Yet I grew up in the back countries of suburban Southern California and the closest thing I had to a bakery was Panera. Honestly, someone needs to take the bakers at Panera to Paris or San Francisco to show them what bread is supposed to taste and look like.
Lacking any proper boulangeries but dreaming of real bread from pictures on the internet, I spent my pre-college years attempting to bake the quintessential french bread, or baguette de pain. Now, after my foray into the gastronomical worlds of the Bay Area and Paris, I am still ever obsessed with bread. So basic and fundamental, so easily ignored on a table full of exciting appetizers and gorgeous main dishes, excellent bread is, however, a life-changing experience (if only for a few minutes of consumption and mastication).
[As a side note, one must go to Germany to eat the bread there as well. Their breads are more dense, chewy, often made with whole-wheat flour and covered with a wonderful combination of seeds. One major thing I remember about my trip to Cologne was the bread.]
So, because of a couple of requests from friends that I teach them to bake bread and the rather unfortunate fact that the process takes a little under two days, I decided to create a step-by-step tutorial on the how-to’s of creating artisan-style French bread. First, the recipe:
French Bread Recipe
or pain de baguette… recipe adapted from Peter Reinhart’s.
Ingredients
2 1/4 cup flour (all-purpose or bread flour and/or wheat flour; it depends on how dense you want this bread. N.B., the more wheat flour you use, the more water you would need to compensate)
3/4 tsp salt
1/2 tsp instant yeast
3/4 cup + 2 tbs water, room temperature (add 1 tbs at a time as necessary, since humidity, type of flour, etc. changes how much water you need for a proper dough).
You need the above ingredients twice, as you make the first half of the dough 24hrs to three days before, keeping it in the refrigerator, and the second half on the day you wish to bake the bread.
Also, I like to use SAF Red Instant Yeast, which allows you to skip the ‘add warm water to yeast and wait 10-15 minutes’ part. It’s quite reliable and lasts for a long time in the refrigerator/freezer. It’s available in Costco and online.


Directions
Step 1: Mix all the ingredients in a large bowl. As you can see, I accidentally added a bit too much water and it’s a bit gloopy. Not to worry if this happens, you can just knead for a longer time when you combine this dough with the second half of the dough (more preferable), or add a bit more flour (not too good, since it messes a bit with the salt/flour/yeast ratios).


Step 2: Cover and let rise 1 hour, and then knead a bit to let out some of the gas that has been developing in the dough. Place in the refrigerator for 24 hours (up to three days). Make sure that this bowl is big enough, since that yeast will make the dough rise to twice its size! I’ve made a mess in the fridge before when I unthinkingly put a large chunk of dough to let rise in the fridge over night. There was a carb-volcanic explosion the next day.
As you can see from the photo below, the consistency of the dough has changed. It’s more bubbly and a bit more smooth.
Step 3: Remove the dough from the fridge and let sit for 1 hour. You want to make that cold cold dough come back closer to room temperature!

Step 4: Mix the ingredients listed above to make the second half of the dough and add it to the first half. Knead it to a rather rough ball. You don’t want to knead it too much in the beginning, it’ll be a waste of energy anyway! You’re not trying to develop the gluten at this point. The dough should come together and look something like this:

Step 5: Let rise for approximately 2 hrs, or until the dough doubles in size.
Step 6: Knead the dough until it forms a smooth ball. This should not be too hard since letting the dough rise will have allowed the gluten to form all by itself. I wanted to get photos of my kneading, but it was hard to do since I need both hands. Suffice it to say that you take the end of the dough farthest from you, fold it towards you and push down into the rest of the dough by the heel of your hands. If this is hard to visualize, there are a number of videos you can find on youtube.

Step 7: Divide the dough into three pieces after letting the dough rise for another hour.
Step 8: Shape the three pieces of dough. First, fold the dough into itself to create a single seam and to begin making a loaf shape. Let rest for 10 to 15 minutes when the dough starts pulling back into itself.

Step 9: Roll out the dough into long, baguette-shaped pieces as pictured below. Let rise for 1 hr and 3o minutes.

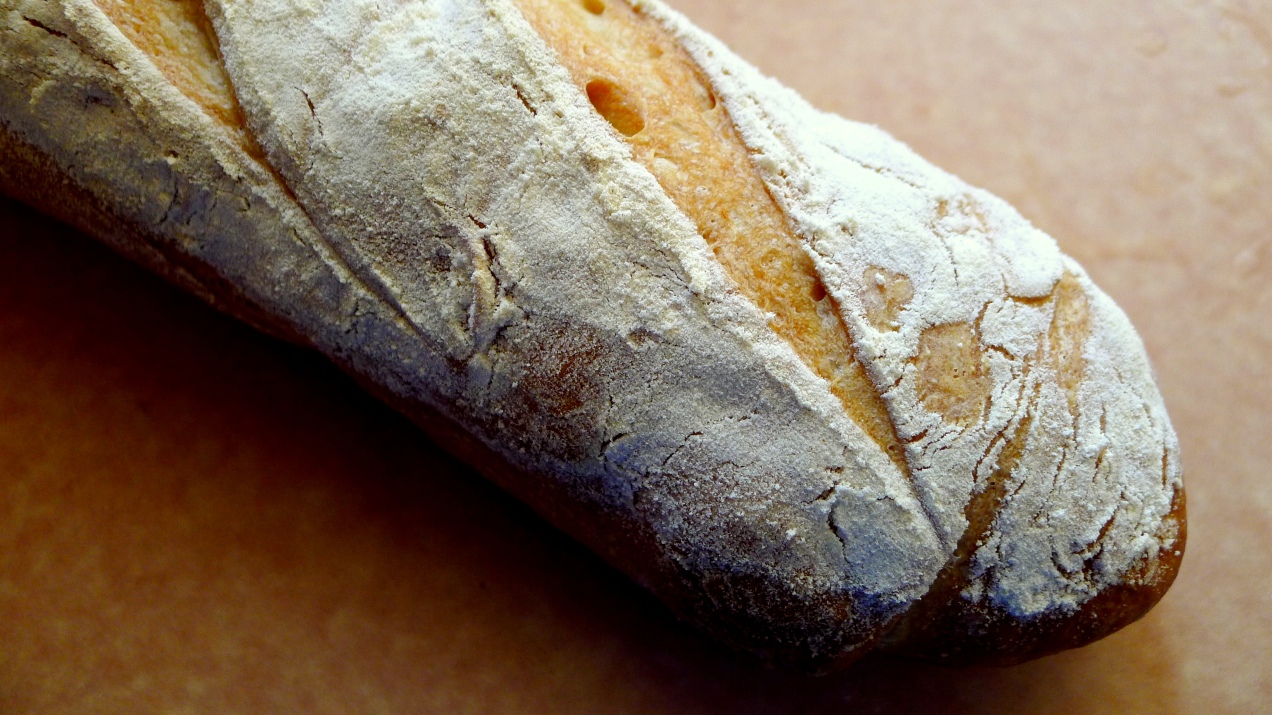
Step 10: Move onto a cookie sheet drizzled with some olive oil. Then, score the dough with a sharp knife. I sprinkled sesame seeds on top of one and caraway seeds on another. You can brush the tops of the baguette with egg whites. It will allow for a darker color and for the seeds to stick to the dough.


Step 11: Place in oven that is preheated at 375 F for 35-45 minutes or until golden-brown. I also like to put a small baking pan on the rack below, filling it with 1 cup boiling water right as I place the dough in the oven. This creates steam, making the bread rise longer.


Although this bread tastes wonderful all by itself, I decided to make some bruschetta for lunch in order to get some vegetables in our diet.
Bruschetta
serves 4-5
Ingredients
3 medium-sized tomatoes
1 small onion
1/3 cup fresh basil
1/4 cup olive oil
1/2 tsp salt
1/4 tsp black peppers
5 cloves garlic
if you don’t have fresh herbs on hand,
1/2 tsp dried parsley
1/2 tsp dried basil
1/4 cup grated parmesan or sharp white cheddar cheese
Directions
Dice the tomatoes, onions, and finely mince the garlic. Combine and add the olive oil, salt, pepper, and herbs.
Place a spoonful of the mixture on slices of bread that are lined up on the baking sheet. Grate some cheese over the bread and pop in the oven. Broil for 4-5 minutes or until cheese is slightly browned and the bread nicely toasted.


Or, you could just slather on some blueberry-goat cheese…